
Dust Collection System (2003)
I've always wanted a good dust collection system, but never got around to purchasing and installing one until I moved into our new house with a basement shop. My wife and I didn't want to get the house dirty with wood dust from the shop, so we decided to bite the bullet and install a dust collection system. After having lived with it for a while I'm sure glad we did! Not only is our shop and house kept clean, but I've significantly reduced my health risks due to exposure to wood dust.
This system is comprised of several elements, and you can go directly to them on this page with these links:
Dust Collector - Ductwork - Machine Connections - Blast Gates - Chip Seperator - Ambient Air Filter - Respirator
Dust Collector:
I did a bunch of research into DC's before purchasing a collector. I would have loved to be able to use a cyclone DC, but the money and height requirements for these units were prohibitive. I decided to buy a Jet 1100 canister DC as show below, and you can read my review of that machine on this page.
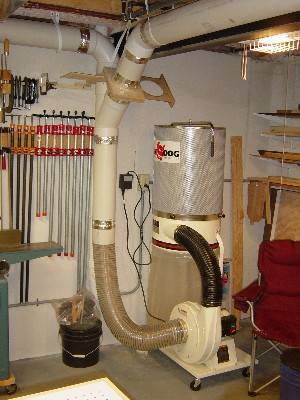
I've been very happy with this purchase. The canister does a good job of filtering down to 2 microns, and it's exceptionally easy to clean the canister filter with the revolving flappers. You can really see the fine dust falling down into the clear bottom bag when you use the flappers. The clear bottom bag is great for being able to tell when it's time to be emptied. The unit was very easy to assemble and it came with a great users manual (as do most Jet tools). I didn't have 220V available in the shop at the time I made this purchase, so I decided to buy the 110V system instead. There is only a quoted 100 cfm difference between the 110V and 220V system, so I haven't sacrificed much in terms of airflow.
Ductwork:I've chosen to install 6" ductwork to service my main shop tools. I found 6" Sewer & Drain PVC at a Lumber shop about an hour from my house (I tried hard, but couldn't find 6" S&D PVC locally) and paid about $10 for each 10' length of pipe. I ran the ductwork overhead and secured it to the floor joists with plumbing strap hangers. When I originally installed the system I caulked all the joints to prevent leaks, but after making several changes to the ductwork I decided that caulking was too much of a PITA to remove, so all my joints are now taped with metal HVAC tape instead. The tape is much easier to remove if any changes are needed in the system.
Most (all but 2) of the elbows in my ductwork are made from two 45 degree elbows. This helps reduce static pressure loss in the system. If you need to transition from 6" to 4" duct, do it with a smooth tapered fitting instead of a bushing – again to minimize static pressure loss. You can find 6" to 4" metal tapered reducers in the HVAC section of Lowes/HD.
Machine Connections:I used clear 6" and 4" wire reinforced flexible hose to connect the PVC ductwork to each machine. The flexible hose has a much larger pressure drop per foot than does smooth PVC ductwork, so I kept the amount of flex hose to a minimum. Flex hose is very expensive – especially the 6" size. If you shop around you'll probably find some on sale or if you buy from Amazon at least you can avoid paying shipping and tax.
I started all my machines with the stock DC connectors, and over time upgraded them to use the full flow available from the 6" ductwork. Machines on 6" connections include the bandsaw, compound miter saw, tablesaw (4" to the overarm blade guard and saw cabinet), and router table (4" to the fence and router cabinet). A few machines remain on 4" drops (jointer, planer, and downdraft table) mostly because they're working fine that way, but I may also upgrade them as time allows. Even these machines with 4" drops are fed from a 6" main, so there's plenty of suction and flow available to them. You can see some of the modifications I've made to the stock dust colletion hoods at this link.
I also have a few "utility drops" piped into my system at a few places. This allows me to connect portable equipment (like planers, sanders, etc) at various locations around my shop. They're also handy for temporary hose connections to clean up your benchtop and floor.
Blast Gates:I started out using purchased plastic blast gates to get my system up and running, but over time I've upgraded them to shop-made gates. You can read about their construction on this page. I installed them as close to the main trunk lines as possible. This keeps the amount of "dead pipe" in the system minimized when the blast gates are closed.
Chip Seperator:
I've also started to use a garbage-can chip seperator for my heavy chip generating tools. When I'm planing or jointing a big load of rough lumber the seperator keeps my dust collector bag from filling too quickly. Most of the big chips settle in the garbage can and the fines are passed to the DC. The seperator works well, but is a bit of a hassle to set up, so I don't use it unless I'm preparing several boards like I usually do at the beginning of a project.
Ambient Air Filter:
Another key piece of equipment I'm using to help controll dust is a Jet ambient air filter. This does a geat job controlling nuisance dust and collecting the hazardous fine dust particles that pass through the dust collector. You can read about that tool on this page.
Respirator:
Regardless of these improvements, I still wear a 3M half-face dust respirator when sanding. The health hazards of fine dust particles are well known, and although these dust collection systems reduce my exposure dramatically I feel that using a respirator is such a simple and easy thing to do that I owe it to myself to go the extra mile.
These systems have not only have I greatly reduced my health risks due to wood dust, but they've done a good job in keeping the shop and house clean.
© Copyright 2006 Chris Billman